How to Crochet a Kuromi Hat: Complete Step-by-Step Guide for All Sizes
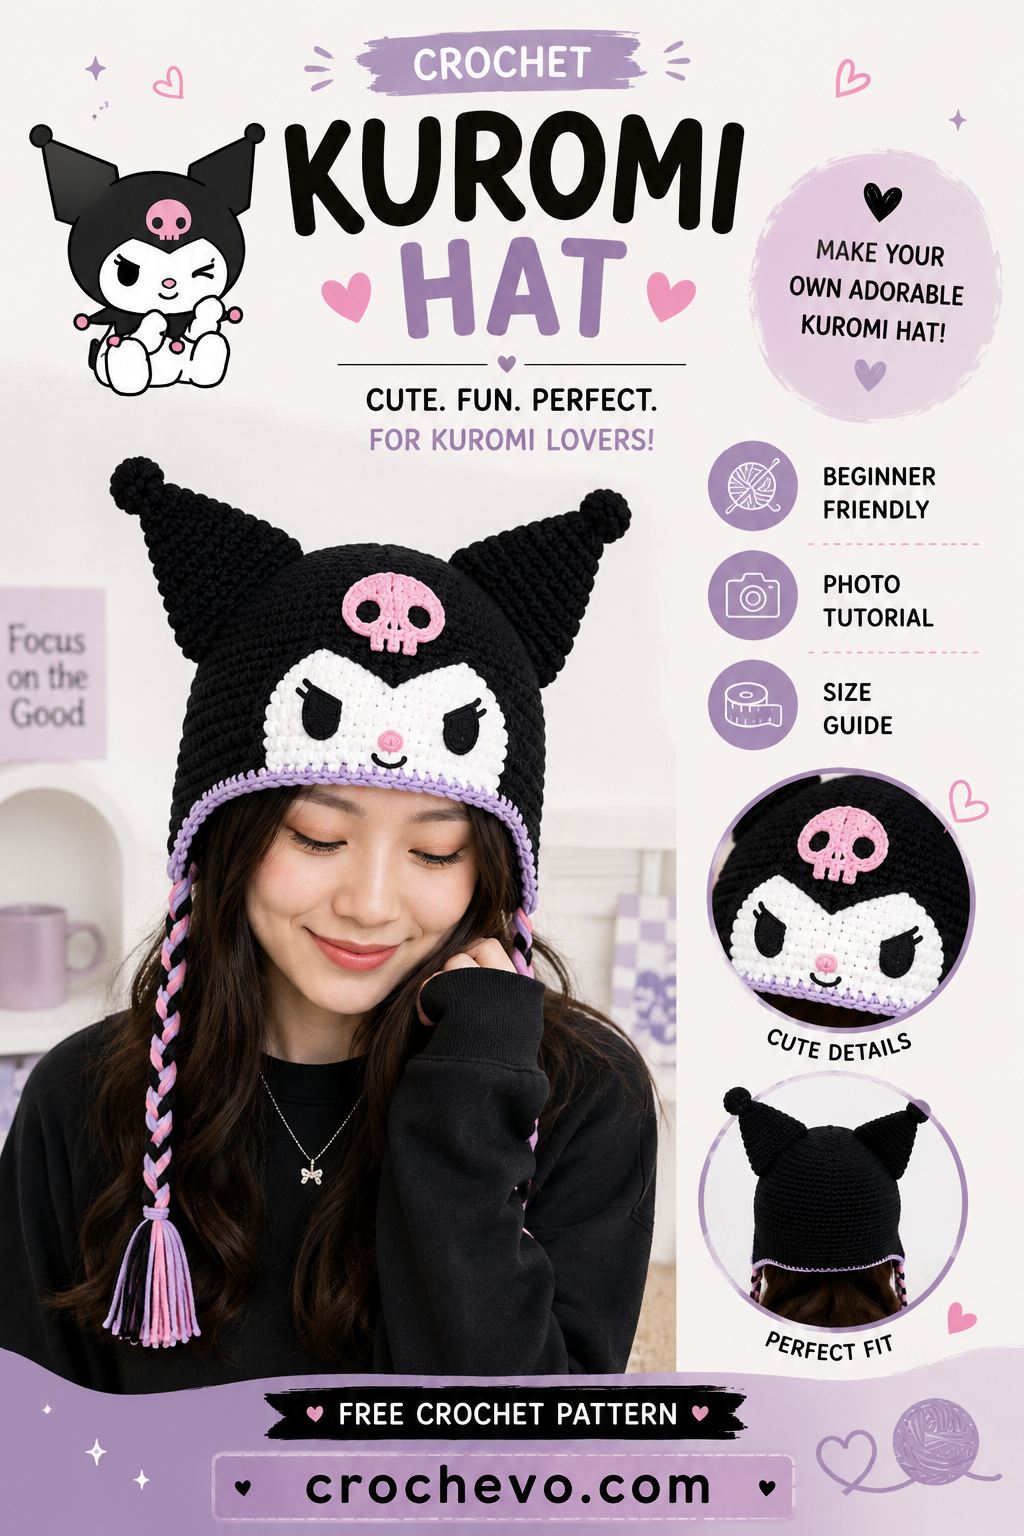
If you are looking for a cute and fun crochet Kuromi hat, this pattern is a great project to try. This design is inspired by the hat shown in the photo, with a black crocheted body, pointed ears, a white Kuromi-style face, a pink skull, purple edging, and colorful side braids.
The hat looks detailed, but you can make it one part at a time. The main hat is crocheted first, followed by the ears, face, skull, braids, and small finishing details.
This guide explains the stitches in simple words, so it is suitable for confident beginners and anyone who wants to learn while making a Kuromi crochet hat.
Note: This is an original Kuromi-inspired construction guide based on the visible design of the supplied image. It is not claimed to be the original designer’s pattern.
What You Will Make
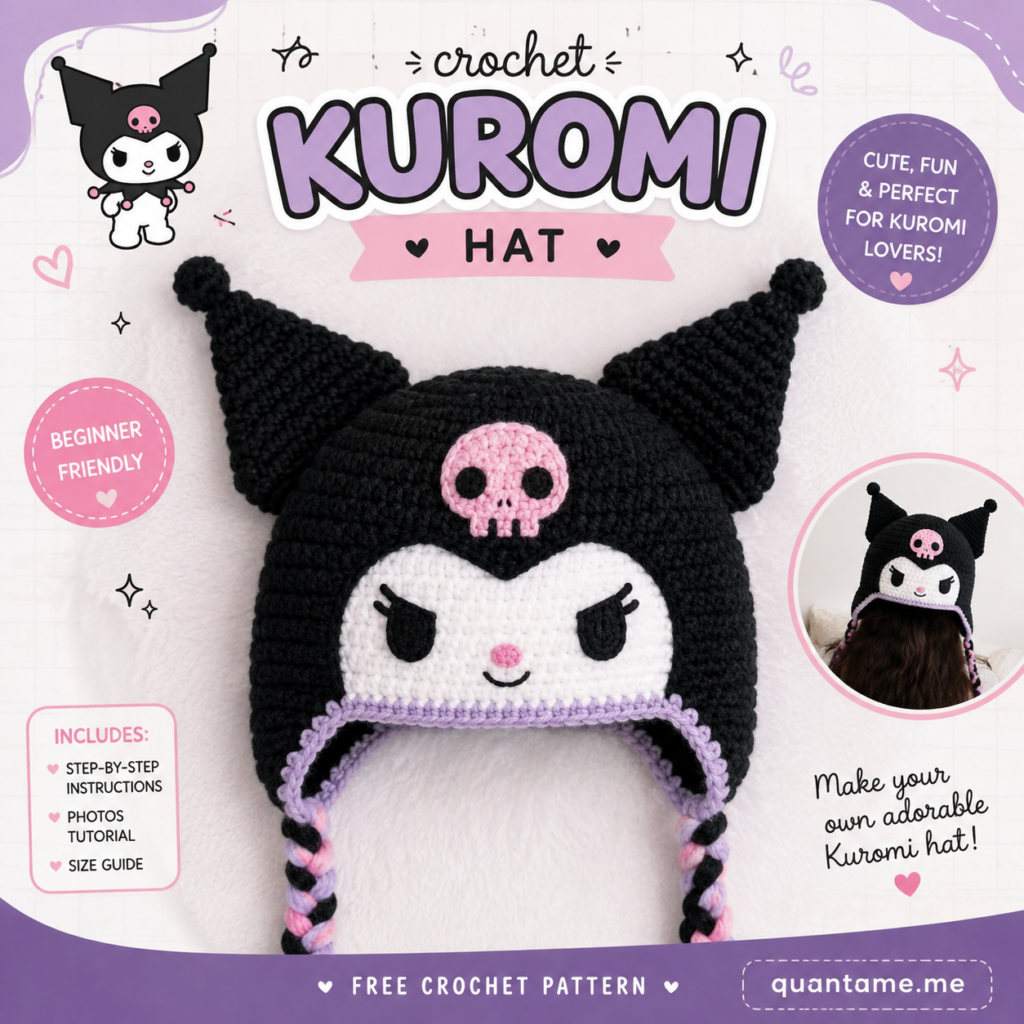
The finished crochet Kuromi hat includes:
- Black crochet hat
- Two tall pointed black ears
- White face panel
- Black eyes
- Pink nose
- Black smile
- Pink skull decoration
- Purple bottom edging
- Two long side braids
- Pink, purple, and black tassels
The braids are optional, so you can leave them off if you want a simpler hat.
Materials Needed
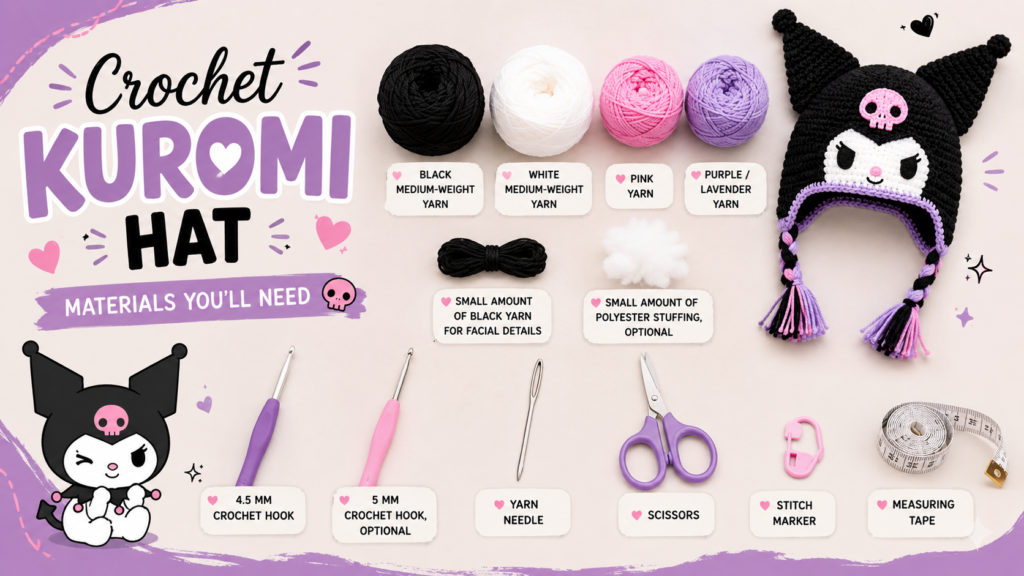
For the main hat:
- Black medium-weight yarn
- White medium-weight yarn
- Pink yarn
- Purple/lavender yarn
- Small amount of black yarn for facial details
- 4.5 mm crochet hook
- 5 mm crochet hook, optional
- Yarn needle
- Scissors
- Stitch marker
- Measuring tape
- Small amount of polyester stuffing, optional
Yarn colors
For the look in the photo, use:
- Black: main hat and ears
- White: face
- Pink: nose, skull and braid accents
- Purple/lavender: bottom border and braid accents
You can change these colors to create your own version.
Crochet Abbreviations
| Abbreviation | Meaning |
|---|---|
| ch | Chain |
| sl st | Slip stitch |
| sc | Single crochet |
| hdc | Half double crochet |
| dc | Double crochet |
| inc | Increase |
| dec | Decrease |
| st | Stitch |
| sts | Stitches |
| rnd | Round |
| rep | Repeat |
| BLO | Back loop only |
| FLO | Front loop only |
Every Stitch Explained
Chain Stitch — ch
- Make a slip knot.
- Put your hook through the loop.
- Yarn over.
- Pull the yarn through the loop.
You have made one chain.
Slip Stitch — sl st
Insert the hook into the stitch, yarn over, and pull the yarn through both the stitch and the loop on your hook.
Slip stitches are mostly used for joining.
Single Crochet — sc
- Insert the hook into the stitch.
- Yarn over.
- Pull up a loop.
- Yarn over again.
- Pull through both loops.
One single crochet is complete.
Half Double Crochet — hdc
- Yarn over.
- Insert your hook into the stitch.
- Yarn over and pull up a loop.
- You now have three loops.
- Yarn over.
- Pull through all three loops.
The hdc is the main stitch used for the hat body.
Double Crochet — dc
- Yarn over.
- Insert your hook into the stitch.
- Yarn over and pull up a loop.
- Yarn over and pull through two loops.
- Yarn over again.
- Pull through the last two loops.
Increase — inc
An increase means making two stitches into one stitch.
For example:
2 hdc in next st
means make two half double crochets in the same stitch.
Decrease — dec
A decrease joins two stitches together.
For an sc decrease:
- Insert the hook into the first stitch.
- Pull up a loop.
- Insert the hook into the next stitch.
- Pull up a loop.
- Yarn over.
- Pull through all three loops.
Crochet Kuromi Hat Size Guide
The following measurements are useful starting points.
| Size | Head Circumference | Approx. Hat Length |
|---|---|---|
| Baby | 14–16 in / 36–41 cm | 6–7 in / 15–18 cm |
| Toddler | 17–18 in / 43–46 cm | 7–7.5 in / 18–19 cm |
| Child | 18–20 in / 46–51 cm | 7.5–8 in / 19–20 cm |
| Teen | 20–21.5 in / 51–55 cm | 8–8.5 in / 20–22 cm |
| Adult Small | 21–22 in / 53–56 cm | 8.5–9 in / 22–23 cm |
| Adult Medium | 22–23 in / 56–58 cm | 9–9.5 in / 23–24 cm |
| Adult Large | 23–24 in / 58–61 cm | 9.5–10 in / 24–25 cm |
These are approximate measurements. For the best fit, measure the person’s head before starting.
Part 1: Crochet the Black Hat Body
The hat in the photo has a rounded black body with a fairly close fit.
We will use half double crochet because it creates a soft, thick fabric.
Round 1
Make a magic ring.
Chain 2.
Make 10 hdc into the ring.
Join with a slip stitch.
Total: 10 sts
Round 2
Chain 2.
Make 2 hdc in every stitch around.
Join.
Total: 20 sts
Round 3
Chain 2.
Repeat:
1 hdc in next st, 2 hdc in next st.
Repeat around.
Total: 30 sts
Round 4
Chain 2.
Repeat:
1 hdc in next 2 sts, 2 hdc in next st.
Repeat around.
Total: 40 sts
Round 5
Chain 2.
Repeat:
1 hdc in next 3 sts, 2 hdc in next st.
Repeat around.
Total: 50 sts
Continue Increasing for Your Size
Do not automatically continue to the same number of stitches for every size.
Continue the increase pattern until the crown reaches the correct width for the head.
A useful estimate is:
Head circumference ÷ 3.14 = approximate crown diameter
For example:
56 cm head circumference:
56 ÷ 3.14 = approximately 18 cm
Once your crown reaches approximately the needed diameter, stop increasing.
Part 2: Crochet the Sides of the Hat
Once the crown is wide enough, crochet:
1 hdc in every stitch around.
Do not increase.
Continue working rounds until the hat reaches the desired length.
Try the hat on as you work.
The hat should come down around the ears and forehead like the sample shown in the photo.
Part 3: Create the Purple Bottom Border
The purple/lavender border is one of the details that makes the pictured design stand out.
Attach lavender yarn at the bottom edge.
Border Round 1
Chain 1.
Make:
1 sc in every stitch around.
Join with a slip stitch.
Border Round 2
Chain 1.
Make:
1 sc in every stitch around.
Join.
Fasten off.
Weave in the yarn end.
You should now have a thin purple edge around the bottom of the black hat.
Part 4: Crochet the Pointed Kuromi Ears
The ears in the picture are tall and pointed, so they need to be fairly firm.
Make two matching ears.
First Ear
Use black yarn.
Chain 2.
Row 1
Make:
2 sc in the second chain from the hook.
Turn.
2 sts
Row 2
Chain 1.
Make:
2 sc in first st, 1 sc in next st.
Turn.
3 sts
Row 3
Chain 1.
Make:
1 sc in every stitch.
Turn.
3 sts
Row 4
Chain 1.
Make:
2 sc in first st, sc across.
Turn.
4 sts
Row 5
Sc across.
Row 6
Increase once at the beginning.
5 sts
Continue this pattern until the ear is approximately:
- Baby: 3.5–4.5 in tall
- Toddler: 4–5 in
- Child: 4.5–5.5 in
- Teen: 5–6 in
- Adult: 5.5–6.5 in
Then start decreasing toward the point.
Shaping the Ear Point
When the ear is wide enough, begin decreasing.
At the beginning of each row:
sc2tog
Then sc across.
Continue until only 2 stitches remain.
On the final row:
sc2tog
Fasten off.
You should have a tall triangular ear.
Make a second ear exactly the same size.
Part 5: Make the Ears 3D
The ears in the photo have some body instead of lying completely flat.
For each ear, make two identical black triangles.
Place them together.
Using black yarn, single crochet around the sides.
Before closing completely, add a very small amount of stuffing.
Do not overfill.
Close the bottom.
Now you have a firm, 3D ear.
Part 6: Attach the Ears
Place the ears on top of the hat.
Look at the hat from the front.
Make sure both ears are the same distance from the center.
Sew the bottom of each ear onto the hat using black yarn.
Use several stitches because the ears need to stay upright.
Check the shape before cutting the yarn.
Part 7: Make the White Kuromi Face
The white face panel is the biggest decoration on the front of the hat.
For the design shown in the photo, the face should be wider at the top and slightly narrower toward the bottom.
Use white yarn.
Face Base
Chain 10.
Row 1
Sc across.
Turn.
Row 2
Chain 1.
Sc across.
Turn.
Continue working rows until the face is approximately the desired height.
For larger sizes, add more starting chains and more rows.
Shape the Top of the Face
To create a wider, rounded upper section, add increases near the outer edges.
For example:
2 sc in first st, sc across, 2 sc in last st.
Repeat this on selected rows until you reach the desired width.
Shape the Bottom
Once the face is wide enough, begin decreasing.
Use:
sc2tog
near both sides.
This makes the lower part of the face slightly narrower.
The finished piece should look like a rounded face shape rather than a plain rectangle.
Part 8: Attach the White Face
Place the white face panel on the front of the black hat.
The top should sit below the black ears.
Pin it in place or hold it carefully.
Using white yarn, sew around the outside.
Take small stitches so the seam is neat.
Do not sew the face too tightly because the hat still needs to stretch.
Part 9: Make Kuromi’s Eyes
The eyes in the pictured design are black and expressive.
You can crochet small black shapes or embroider them.
For a simple crochet eye:
Chain 4.
Work sc around the chain.
Add a few decreases to create a small rounded shape.
Make two matching eyes.
Sew them onto the white face.
Part 10: Add the Eyelashes
Use black yarn and a yarn needle.
Make two or three short stitches extending outward from each eye.
Keep both sides similar.
These little details help give the face the same cute expression as the pictured design.
Part 11: Make the Pink Nose
The nose is small, so embroidery is the easiest method.
Use pink yarn.
Make several tiny stitches in an oval shape.
Tie the yarn securely on the back.
Part 12: Embroider the Smile
Use black yarn.
Make a small curved smile under the nose.
You can make the smile with a few short stitches.
Keep it centered between the eyes.
Part 13: Make the Pink Skull
The pink skull sits above the white face on the black section of the hat.
This is an important part of the crochet Kuromi hat design.
Use pink yarn.
Skull Base
Chain 8.
Sc across.
Continue working rows until you have a small rounded rectangle.
To round the top, make small increases at the corners.
To shape the bottom, use decreases.
The finished skull should be approximately:
- Baby: 1.5–2 in
- Toddler: 2 in
- Child: 2–2.5 in
- Teen: 2.5 in
- Adult: 2.5–3 in
Part 14: Add Skull Details
Use black yarn.
Add:
- Two eye holes
- Small nose
- Small mouth
- Two or three tiny teeth/details at the bottom
Sew the skull onto the black hat above the white face.
Make sure it is centered.
Part 15: Make the Side Braids
The pictured hat has long braids hanging from both sides.
These are made separately and attached to the bottom sides of the hat.
You can make simple three-strand braids.
For each side, cut several long pieces of:
- Black yarn
- Pink yarn
- Purple/lavender yarn
Make the strands approximately:
- Baby: 18–22 in
- Toddler: 22–26 in
- Child: 26–30 in
- Teen: 30–34 in
- Adult: 34–38 in
Remember that braiding makes the final length shorter.
Part 16: Make the Braids
Separate the yarn into three sections.
Cross the right section over the middle.
Then cross the left section over the middle.
Repeat until you reach the desired length.
Tie the bottom securely.
Repeat for the second side.
Try to make both braids the same length.
Part 17: Add Pink and Purple Tassels
The sample has colorful tassels at the bottom of the braids.
Wrap pink, purple, and black yarn around your fingers several times.
Remove the yarn carefully.
Tie another piece of yarn tightly around the top.
Cut the bottom loops.
Trim the ends so they are even.
Attach the tassel to the bottom of the braid.
Repeat on the other side.
Part 18: Attach the Braids to the Hat
Find the sides of the hat.
Attach one braid on each side near the bottom edge.
Sew securely with black yarn.
Make sure the attachment point is strong enough to handle movement.
Part 19: Final Details
Now look carefully at your finished crochet Kuromi hat.
Check:
- Are both ears the same size?
- Are the ears firmly attached?
- Is the white face centered?
- Are the eyes level?
- Is the pink nose centered?
- Is the skull straight?
- Is the purple border even?
- Are both braids similar in length?
- Are all yarn ends hidden?
Make any small adjustments before wearing the hat.
Easy Size Adjustments
If you want to make this Kuromi crochet hat pattern for different ages, you mainly need to change three things:
1. Hat circumference
Make the crown smaller or larger.
2. Hat length
Add or remove regular body rounds.
3. Ear size
Make smaller ears for babies and larger ears for teens and adults.
The face and skull should also be scaled with the hat.
Crochet Kuromi Hat Gauge
For the best results, make a small test piece first.
With medium-weight yarn and a 5 mm hook, aim for approximately:
14–16 hdc = 4 inches / 10 cm
and approximately:
10–12 hdc rows = 4 inches / 10 cm
Your exact gauge will depend on your yarn and tension.
If your stitches are too loose, use a smaller hook.
If your stitches are too tight, use a larger hook.
Tips for Making the Hat Look Like the Photo
The visual details are what make this crochet Kuromi hat different from an ordinary cat-ear hat.
Keep the body black
The black body creates the main Kuromi look.
Make the ears tall
Short ears will give the hat a different appearance. For the pictured style, make them tall and pointed.
Make the white face wide
The white face should cover a good portion of the front.
Use a bright pink skull
The pink skull creates a strong contrast against the black hat.
Add the purple border
The thin lavender border gives the bottom edge the same colorful finishing touch.
Do not skip the braids
The long side braids and colorful tassels are an important feature of the pictured design.
Common Problems and Easy Fixes
My hat is too tight
Try a larger crochet hook or add another increase round.
My hat is too loose
Use a smaller hook or stop increasing earlier.
My ears flop over
Make two layers for each ear and add a small amount of stuffing.
My white face is too small
Add more stitches around the outside or crochet a larger face panel.
My skull looks too big
Reduce the starting chain and number of rows.
My braids are different lengths
Measure the yarn before braiding and trim both braids to the same finished length.
My purple border is uneven
Work one additional sc round and keep your tension relaxed.
Is This Crochet Kuromi Hat Beginner-Friendly?
Yes, especially if you already know the basic crochet stitches.
The project uses simple stitches such as:
- Chain
- Single crochet
- Half double crochet
- Slip stitch
- Increase
- Decrease
The most time-consuming parts are the face, ears, skull, and braids.
If you are completely new to crochet, practice the basic stitches first and make the hat one section at a time.
Frequently Asked Questions
How do I crochet a Kuromi hat?
Start by crocheting a black beanie from the top down using hdc stitches. After the main hat is finished, make two pointed ears and sew them to the top. Then add the white face, black eyes, pink nose, pink skull, purple border, and side braids.
What colors do I need for a crochet Kuromi hat?
For the design shown here, you need mainly black, white, pink, and lavender/purple yarn.
What stitch is best for the hat body?
Half double crochet is a good choice because it creates a thick, comfortable fabric without making the project too slow.
Can I make this Kuromi crochet hat for a child?
Yes. Adjust the crown diameter and hat length according to the child’s head measurement. The same basic design can be adapted for baby, toddler, child, teen, and adult sizes.
How do I make the Kuromi ears stand up?
Make each ear from two layers of crochet and sew the layers together. A small amount of stuffing can help them keep their shape.
Can I make the braids shorter?
Yes. Simply use shorter yarn strands before braiding.
Do I have to add the braids?
No. The braids are optional. The hat will still work without them.
Final Thoughts
This crochet Kuromi hat is more than a simple black beanie. The pointed ears, white face, pink skull, purple edging, and colorful braids all work together to create the cute look shown in the design.
The easiest way to make the project is to work on it in sections. Start with the black hat body, then make the ears, face, skull, and decorative pieces. Finish everything by adding the purple border and colorful braids.
If your first attempt is not perfect, do not worry. Crochet takes practice, and small differences are part of handmade work.
Measure the head carefully, check the fit as you crochet, and make sure all decorative pieces are securely attached.
With these steps, you can create your own DIY crochet Kuromi hat in a size that fits a baby, toddler, child, teen, or adult—and customize the colors and decorations to make it your own.