Crochet Pumpkin Hat Free Pattern: Easy Step-by-Step Guide
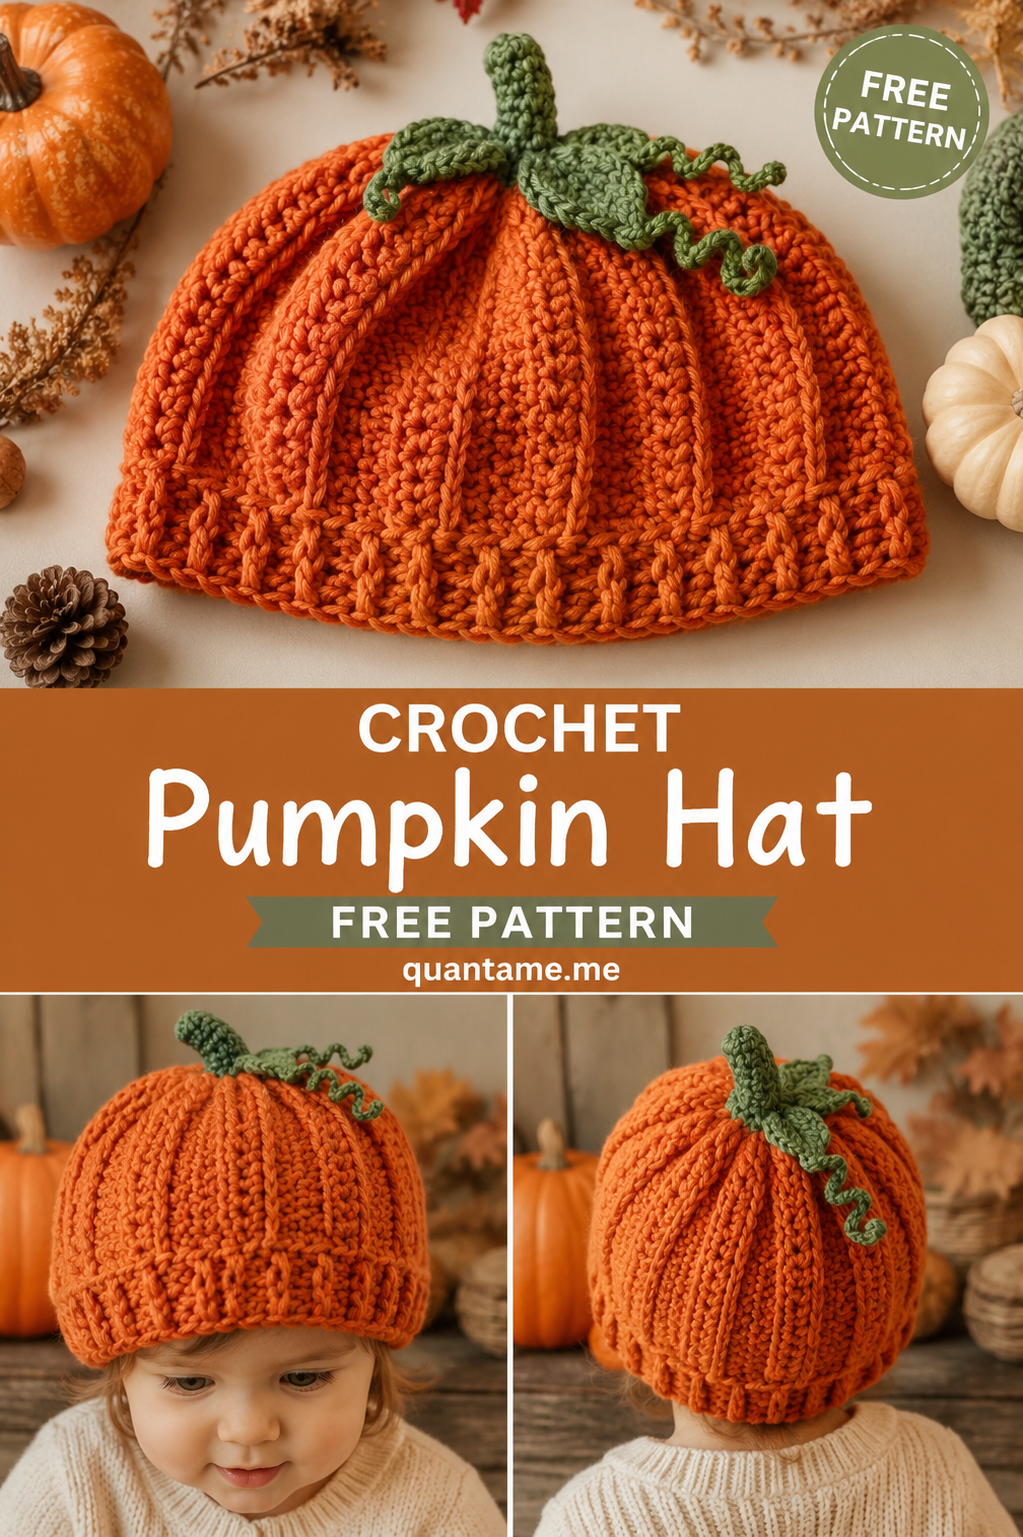
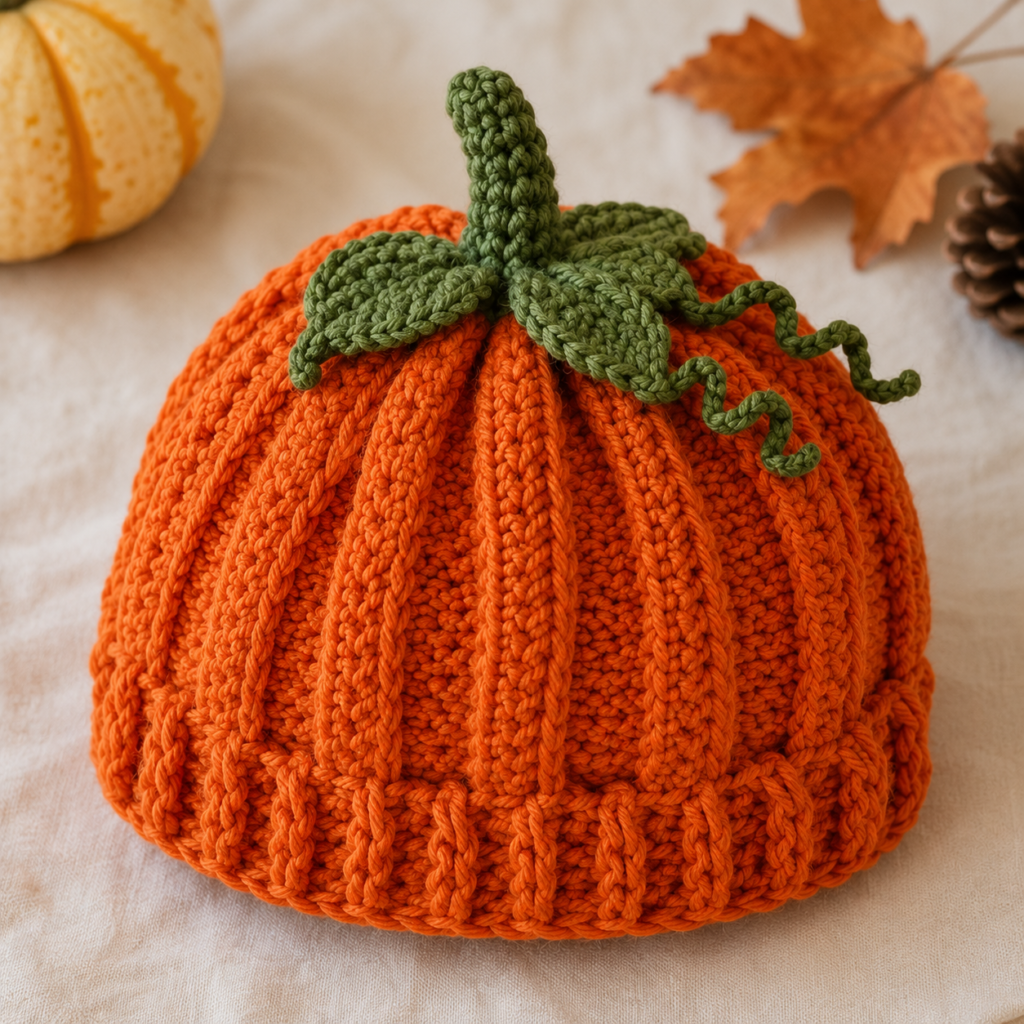
Looking for a cute crochet pumpkin hat free pattern for fall? This pumpkin-inspired hat is a fun project for babies, toddlers, children, and adults. It has a warm orange body with raised vertical ridges, a ribbed-looking bottom edge, and a cute green stem, leaves, and curly vines on top.
The design in the photo has a soft, rounded pumpkin shape rather than a flat beanie. The raised lines running from the top to the bottom give it the look of real pumpkin sections.
This crochet pumpkin hat pattern is beginner-friendly once you know a few basic stitches. You can make it for Halloween, Thanksgiving, fall photos, pumpkin patches, or as a handmade gift.
Pattern note: The instructions below are an original crochet construction designed to recreate the visible style of the supplied photo. The exact original stitch counts cannot be determined from a photograph alone, so measurements and gauge are included to help you get the same look.
Crochet Pumpkin Hat Free Pattern at a Glance
Skill level: Beginner to easy intermediate
Crochet type: Worked flat and seamed
Main stitch: Half double crochet in the back loop
Colors: Orange, green
Hook: 4.5–5 mm
Construction: Rectangle → seam → gather top → add stem, leaves, and vines
The special part of this pattern is the use of back-loop-only stitches. They create the raised vertical ridges that make the hat look like a pumpkin.
Materials You Will Need
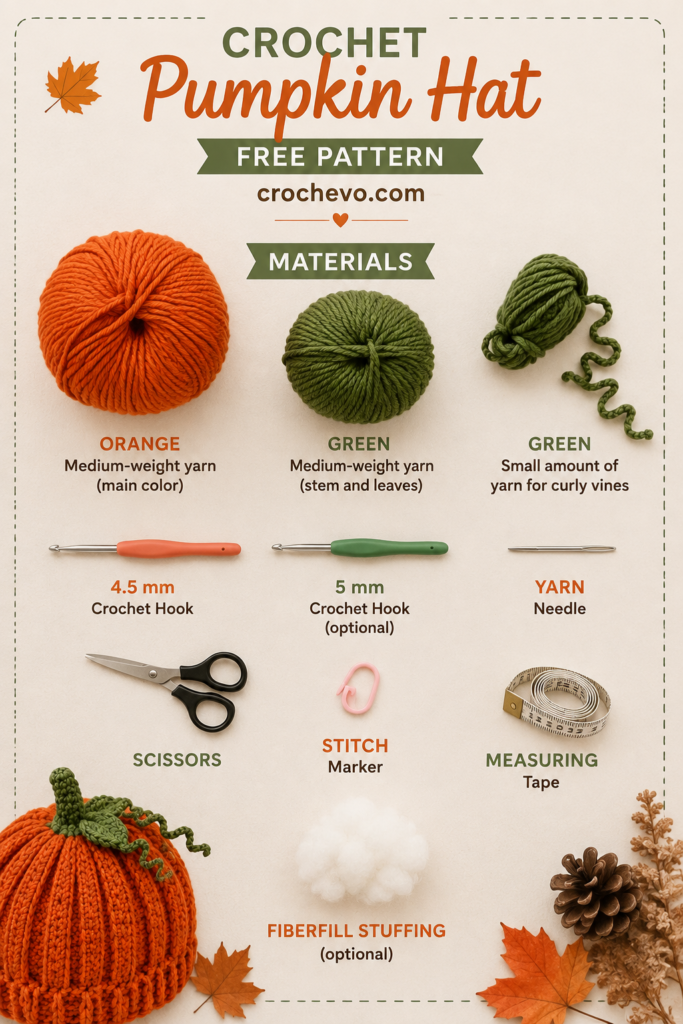
For this crochet pumpkin hat free pattern, gather:
Yarn
- Orange medium-weight yarn — main color
- Green medium-weight yarn — stem and leaves
- Small amount of green yarn for the curly vines
Crochet tools
- 4.5 mm crochet hook
- 5 mm crochet hook, optional
- Yarn needle
- Scissors
- Stitch marker
- Measuring tape
- Fiberfill stuffing, optional
You do not need much green yarn. Most of the project uses orange yarn.
Crochet Pumpkin Hat Size Chart
The easiest way to get a good fit is to measure the head before you start.
| Size | Head Circumference | Approx. Hat Height |
|---|---|---|
| Newborn | 13–14 in / 33–36 cm | 5–5.5 in / 13–14 cm |
| Baby | 14–16 in / 36–41 cm | 6–6.5 in / 15–16.5 cm |
| Toddler | 17–18 in / 43–46 cm | 6.5–7 in / 16.5–18 cm |
| Child | 18–20 in / 46–51 cm | 7–7.5 in / 18–19 cm |
| Teen | 20–21.5 in / 51–55 cm | 8–8.5 in / 20–22 cm |
| Adult Small | 21–22 in / 53–56 cm | 8.5–9 in / 22–23 cm |
| Adult Medium | 22–23 in / 56–58 cm | 9–9.5 in / 23–24 cm |
| Adult Large | 23–24 in / 58–61 cm | 9.5–10 in / 24–25 cm |
Because crochet stretches, make the finished hat slightly smaller than the actual head circumference.
Crochet Abbreviations
Here are all the abbreviations used in this pumpkin hat pattern.
| Abbreviation | Meaning |
|---|---|
| ch | Chain |
| sc | Single crochet |
| hdc | Half double crochet |
| dc | Double crochet |
| sl st | Slip stitch |
| BLO | Back loop only |
| FLO | Front loop only |
| inc | Increase |
| dec | Decrease |
| st | Stitch |
| sts | Stitches |
| rep | Repeat |
| rnd | Round |
| row | Row |
How to Crochet the Basic Stitches
Chain Stitch — ch
The chain stitch creates the foundation for your crochet piece.
- Make a slip knot.
- Put your hook into the loop.
- Yarn over.
- Pull the yarn through the loop.
One new loop equals one chain.
Single Crochet — sc
- Insert your hook into the stitch.
- Yarn over.
- Pull up a loop.
- Yarn over again.
- Pull through both loops.
You have made one single crochet.
Half Double Crochet — hdc
This is the main stitch for the pumpkin hat.
- Yarn over.
- Insert the hook into the stitch.
- Yarn over.
- Pull up a loop.
- You now have three loops on the hook.
- Yarn over.
- Pull through all three loops.
That is one hdc.
What Does BLO Mean?
BLO means Back Loop Only.
Normally, when you crochet into a stitch, you work under both loops at the top.
For BLO:
- Look at the top of the stitch.
- You will see two loops.
- Ignore the loop closest to you.
- Put your hook through the loop farthest from you.
- Complete the stitch normally.
Working hdc stitches in BLO creates a raised ridge.
These ridges are what give the finished crochet pumpkin hat its pumpkin-like sections.
How the Pumpkin Hat Is Made
Unlike a regular beanie that is crocheted in circles, this design is easier to create by making a ribbed rectangle.
You will:
- Crochet the orange rectangle.
- Sew the short edges together.
- Gather the top.
- Finish the bottom.
- Add the stem.
- Add leaves.
- Add curly vines.
This method creates the tall vertical lines visible in the photo.
Part 1: Crochet the Orange Pumpkin Body
Use orange yarn.
The first chain controls the height of the hat.
The number of rows controls the circumference.
This is important because you can easily adjust the pattern to fit any head.
Baby Size
Chain 18.
Row 1
Hdc in the 3rd chain from the hook.
Hdc across.
You should have approximately 16 hdc.
Turn.
Row 2
Ch 2.
Hdc BLO across.
Turn.
Rows 3–38
Repeat Row 2.
You will have a long ribbed rectangle.
Measure the rectangle around the baby’s head.
Stop when it comfortably reaches around the head with a little stretch.
Toddler Size
Chain 20.
Row 1
Hdc in the 3rd chain from the hook.
Hdc across.
Approximately 18 hdc.
Turn.
Rows 2–44
Ch 2.
Hdc BLO across.
Turn.
Continue until the rectangle measures approximately 16–17 inches around when gently stretched.
Child Size
Chain 22.
Row 1
Hdc in the 3rd chain from the hook.
Hdc across.
Approximately 20 hdc.
Turn.
Rows 2–50
Ch 2.
Hdc BLO across.
Turn.
Continue until the piece measures approximately 18–19 inches around when gently stretched.
Teen Size
Chain 24.
Row 1
Hdc in the 3rd chain from the hook.
Hdc across.
Approximately 22 hdc.
Turn.
Rows 2–55
Ch 2.
Hdc BLO across.
Turn.
Continue until the piece measures approximately 19.5–20.5 inches when gently stretched.
Adult Size
Chain 26.
Row 1
Hdc in the 3rd chain from the hook.
Hdc across.
Approximately 24 hdc.
Turn.
Rows 2–60
Ch 2.
Hdc BLO across.
Turn.
Continue until the rectangle measures approximately 21–22 inches when gently stretched.
For an adult large, continue adding rows until you reach approximately 22–23 inches.
Important Tip About the Number of Rows
Do not worry if your row count is different.
Your measurements matter more than the exact number of rows.
Different yarns and different crochet tension can make one person’s 50 rows much wider than another person’s 50 rows.
For the best-fitting crochet pumpkin hat, wrap the rectangle around the head as you work.
You want the two short edges to meet comfortably.
Part 2: Create the Pumpkin Shape
The raised ridges created by the hdc BLO stitches should run vertically when the hat is worn.
This gives the hat the pumpkin-section look seen in the picture.
Before sewing the rectangle together, gently stretch it.
You should see clear raised lines running from the top toward the bottom.
Part 3: Sew the Hat Together
Fold the rectangle so the two short edges meet.
Use orange yarn and a yarn needle.
Sew the edges together using a whip stitch or mattress stitch.
Work carefully so the seam is secure.
Once finished, turn the hat right side out.
You now have a basic orange pumpkin-shaped tube.
Part 4: Gather the Top
This step creates the rounded top of the pumpkin.
Thread a long piece of orange yarn onto your yarn needle.
Starting around the top edge, weave the yarn through the stitches.
Go all the way around the opening.
Do not pull yet.
Once you have gone around the entire opening, gently pull the yarn.
The top will begin to close.
Keep pulling until the opening is almost completely closed.
Add Pumpkin Stuffing — Optional
For the design shown in the photo, you can add a tiny amount of stuffing near the top if you want a more rounded pumpkin shape.
Do not fill the entire hat.
A small amount around the crown is enough.
If the hat is going to be worn, keep it soft and flexible.
Once you are happy with the shape, pull the opening closed.
Secure the yarn firmly.
Weave the remaining yarn inside the hat.
Part 5: Make the Pumpkin Stem
Now we can make the green stem.
Use green yarn.
Round 1
Make a magic ring.
Work 6 sc into the ring.
Join with a slip stitch.
Round 2
Work:
1 sc in each stitch around.
You should have 6 stitches.
Rounds 3–8
Continue:
1 sc in each stitch around.
Keep the stem narrow.
You should now have a small tube.
Make the Stem Taller
For a stem like the one shown in the photo, continue for another 2–4 rounds.
Fasten off, leaving a long yarn tail.
Add a tiny amount of stuffing if you want the stem to stand upright.
Do not overstuff it.
Sew the bottom closed.
Part 6: Attach the Stem
Place the stem directly in the center of the pumpkin hat.
Use the yarn tail to sew the stem firmly to the gathered top.
Sew around the base several times.
The stem should stand upward rather than falling sideways.
Part 7: Crochet the Pumpkin Leaves
The photo has several green leaves spreading out around the stem.
You can make 3–5 leaves depending on how full you want the top to look.
Use green yarn.
Simple Leaf Pattern
Chain 8.
Starting in the second chain from the hook:
- Sc in next stitch
- Hdc in next stitch
- Dc in next 2 stitches
- Hdc in next stitch
- Sc in next stitch
- Sl st at the end
Now work along the other side of the chain.
This creates a small pointed leaf.
Fasten off, leaving a yarn tail.
Make Larger Leaves
For a larger leaf, chain 10–12 instead of 8.
Use the same stitch sequence but add more hdc and dc stitches in the center.
Make several leaves in different sizes.
This gives the pumpkin top a more natural look.
Part 8: Shape the Leaves
The leaves in the photo are slightly curved.
After crocheting each leaf, gently bend it with your fingers.
You can also use the yarn tail to make a small stitch at the base.
This helps the leaf sit naturally against the top of the hat.
Part 9: Attach the Leaves
Place the leaves around the stem.
Try to spread them in different directions.
Sew each leaf securely to the top of the pumpkin hat.
A good arrangement is:
- One leaf toward the left
- One leaf toward the right
- One leaf toward the front
- One leaf toward the back
You can add more if you want a fuller pumpkin top.
Part 10: Make the Curly Pumpkin Vines
The curly green vines are one of the cutest details in this crochet pumpkin hat free pattern.
They are very easy to make.
Use green yarn.
Simple Curly Vine
Chain 25–35 stitches.
Then work 2 sc into every chain.
Because you are putting two stitches into each chain, the yarn will naturally curl.
Continue to the end.
Fasten off.
You should have a spring-like curly vine.
Make the Vine More Curly
If you want tighter curls:
- Use a smaller hook.
- Make 2 sc in each chain.
- Gently twist the finished vine.
If you want a looser curl:
- Make 1 sc in some chains.
- Use 2 sc in the others.
Part 11: Attach the Curly Vines
Sew the vines around the green leaves and stem.
Do not sew the entire vine down.
Attach only the base.
Let the rest of the vine curl freely.
This gives the top the playful look shown in the picture.
Part 12: Make the Ribbed Bottom Edge
The photo has a thicker textured edge at the bottom of the orange hat.
You can create a simple ribbed border.
Attach orange yarn around the bottom edge.
Border Round 1
Ch 1.
Sc around the entire bottom edge.
Join with a sl st.
Border Round 2
Ch 1.
Work sc around.
Join.
Repeat for 2–3 rounds.
This creates a firm bottom edge.
Optional Stretchy Ribbed Brim
For a stronger ribbed effect, use front-post and back-post stitches.
Front Post Double Crochet
Yarn over.
Insert your hook around the post of the stitch from front to back.
Complete the double crochet.
Back Post Double Crochet
Yarn over.
Insert your hook around the post from back to front.
Complete the double crochet.
Alternate front-post and back-post stitches to create a stretchy ribbed texture.
For beginners, however, the simple sc border is easier.
How to Get the Pumpkin Look
The raised lines are the most important part of this design.
If you want your hat to look like the pumpkin in the photo:
Use BLO stitches
Hdc BLO creates raised ridges.
Keep your tension even
If some rows are loose and others are tight, the ridges may not look even.
Use a rich orange yarn
A bright or deep pumpkin orange makes the texture stand out.
Gather the top firmly
The gathered crown creates the rounded pumpkin shape.
Add several green pieces
The stem, leaves, and curly vines complete the pumpkin look.
Crochet Pumpkin Hat Size Adjustments
You can easily change the pattern.
To make the hat wider
Add more rows to the orange rectangle.
Remember:
More rows = larger circumference.
To make the hat taller
Add more chains at the beginning.
Remember:
More starting chains = taller hat.
To make the hat shorter
Use fewer starting chains.
To make a smaller hat
Make fewer rows.
How to Measure for a Perfect Fit
Take a measuring tape and measure around the person’s head.
Then subtract approximately 1–2 inches (2.5–5 cm) because the crochet fabric stretches.
For example:
If the head measures 20 inches:
20 − 1.5 = 18.5 inches
Your finished hat circumference should be around 18.5 inches, depending on your yarn and tension.
Crochet Pumpkin Hat Gauge
Gauge can vary depending on yarn and hook size.
As a starting point, aim for approximately:
14–16 hdc = 4 inches / 10 cm
and approximately:
10–12 hdc rows = 4 inches / 10 cm
Make a small swatch before beginning if you want a more accurate size.
Common Problems and How to Fix Them
My pumpkin hat is too loose
The rectangle may be too wide.
Remove a few rows and try again.
You can also use a smaller hook.
My hat is too tight
Add more rows to the rectangle.
You can also try a larger hook.
My pumpkin ridges are not visible
Make sure you are working into the back loop only.
BLO stitches create the raised texture.
Also avoid very loose tension.
My pumpkin top looks flat
Pull the gathering yarn more tightly.
You can also add a small amount of stuffing near the top.
My stem falls over
Use a smaller hook for a firmer stem.
You can also add a little stuffing and sew the stem more securely to the crown.
My leaves look flat
Try using a larger hook or add a few stitches around the edges.
You can also curve them gently with your fingers before attaching them.
My curly vine does not curl
Make sure you are increasing along the chain.
Try:
2 sc in every chain.
If it still does not curl enough, use a smaller hook.
Easy Crochet Pumpkin Hat Variations
Once you know how to make this crochet pumpkin hat, you can change the design in many ways.
Halloween Pumpkin Hat
Use bright orange yarn with a darker green stem.
Add a small black spider or leaf.
Baby Pumpkin Hat
Use soft pastel orange and a smaller stem.
Keep the decorations securely sewn.
Pumpkin Beanie
Leave off the leaves and vines for a simpler everyday hat.
Fall Photo Prop
Make a slightly oversized version and use it as a cute fall photography accessory.
Adult Pumpkin Hat
Use a deeper orange yarn and larger leaves for a more grown-up look.
Is This Crochet Pumpkin Hat Beginner-Friendly?
Yes!
The main hat uses a simple repeated stitch:
Half double crochet in the back loop only.
Once you understand that stitch, the body is mostly repetition.
The stem, leaves, and curly vines are also made with basic crochet stitches.
If you are new to crochet, take your time with the first few rows. Once you see the ribbed texture forming, the project becomes much easier.
How Long Does It Take to Crochet a Pumpkin Hat?
The time depends on your experience and the size you make.
A baby-size hat may take around 2–4 hours.
A child-size hat may take around 3–5 hours.
An adult-size hat may take around 4–7 hours.
The leaves, stem, and vines add some extra time.
How Much Yarn Do You Need?
The exact amount depends on the size, yarn weight, hook, and tension.
As a rough starting point:
- Baby: 70–100 g orange yarn
- Toddler: 80–110 g
- Child: 100–130 g
- Teen: 120–150 g
- Adult: 140–180 g
You will need only a small amount of green yarn for the stem and decorations.
It is always better to have a little extra yarn than to run out before finishing.
How to Wash a Crochet Pumpkin Hat
Always check the yarn label first.
For most washable yarns:
- Use cool or lukewarm water.
- Use a gentle detergent.
- Avoid twisting the hat.
- Gently squeeze out excess water.
- Reshape the hat.
- Lay it flat to dry.
Avoid high heat because it may shrink or distort the crochet fabric.
Safety Tips for Baby Hats
If you make this crochet pumpkin hat pattern for a baby or young child, pay special attention to the decorations.
Sew the stem, leaves, and vines firmly.
Avoid loose buttons, beads, or other small pieces.
Check the hat before every use and remove it if any decoration becomes loose.
Frequently Asked Questions
How do you crochet a pumpkin hat?
The easiest method is to crochet a rectangle using hdc BLO, sew the rectangle into a tube, gather the top, and then add a green stem, leaves, and curly vines.
What stitch makes the pumpkin ridges?
Half double crochet worked in the back loop only (hdc BLO) creates the raised vertical ridges.
Can I make this crochet pumpkin hat in different sizes?
Yes. You can make newborn, baby, toddler, child, teen, and adult sizes by changing the starting chain and number of rows.
What yarn is best for a pumpkin hat?
Medium-weight acrylic or acrylic-blend yarn works well. Choose a soft yarn that is comfortable against the skin.
What color yarn should I use?
Orange is used for the pumpkin body, while green is used for the stem, leaves, and vines.
Can I make the stem taller?
Yes. Simply add more rounds of single crochet.
How do I make the pumpkin vines curly?
Chain a length of yarn and work two single crochets into each chain. The increases naturally make the piece curl.
Can beginners make this pumpkin hat?
Yes. The main body uses a repeated hdc BLO stitch, making it a good project for someone who knows basic crochet.
Final Thoughts
This crochet pumpkin hat free pattern is a fun fall project that combines simple stitches with a few cute decorative details.
The secret to getting the pumpkin look is the raised vertical ribbing. By working half double crochet stitches in the back loop only, you create the textured sections that make the orange hat look like a real pumpkin.
After the main hat is finished, the green stem, leaves, and curly vines bring the whole design together.
You can make this crochet pumpkin hat for a newborn, baby, toddler, child, teen, or adult. Simply adjust the measurements to fit the head.
Whether you are making it for a pumpkin patch visit, Halloween, a fall photo session, or just a cozy autumn accessory, this handmade hat is a cute way to celebrate the season. 🎃